

How to Overcome Procrastination Easily
December 5, 2025
Travel Photography Tips for Beginners
December 5, 2025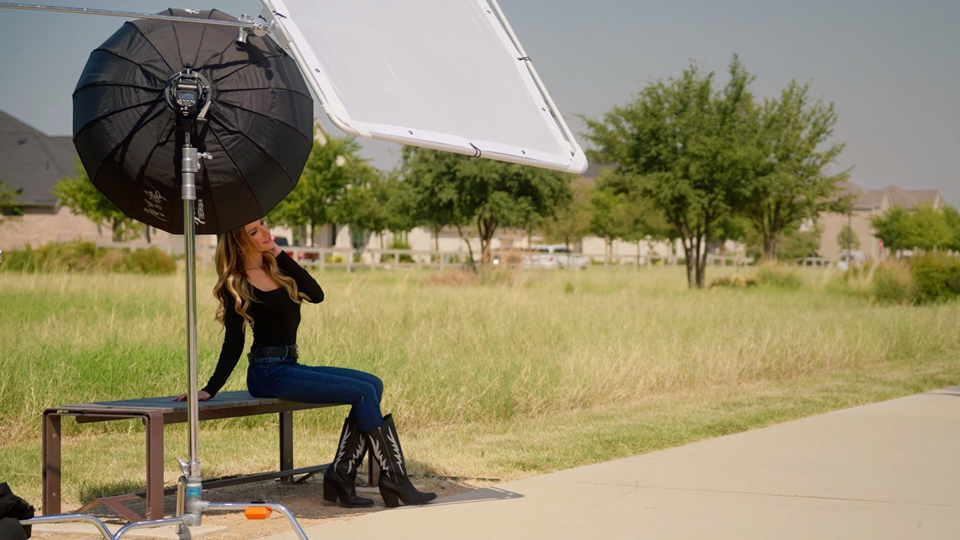
Portrait photography is one of the most rewarding and creative areas of photography. Capturing someone’s personality, mood, or story in a single frame can be magical—but it’s also challenging. Many photographers struggle with making their portraits look natural, flattering, and professional. The good news is that with the right techniques, understanding, and practice, anyone can improve their portrait photography skills.
In this guide, we’ll explore practical tips and strategies to help you take better portrait photos, whether you are a beginner or looking to enhance your skills.
1. Understand Your Subject
The foundation of a great portrait is knowing your subject. Every person has unique features, expressions, and personality traits. Spend a few minutes talking to them, observing their gestures, and making them comfortable.
- Build rapport: Ask them about their hobbies, interests, or day. A relaxed subject will naturally look better in photos.
- Notice details: Watch how they move, smile, or tilt their head. These little details can help you capture their best angles.
Remember, the goal of a portrait is not just to show what someone looks like but to convey who they are.
2. Choose the Right Lighting
Lighting is crucial in portrait photography. The right light can transform a photo, while poor lighting can ruin it.
- Natural light: Soft, diffused natural light from a window or shaded outdoor area is ideal for portraits. Avoid harsh midday sunlight, as it can create unflattering shadows.
- Golden hour: The first hour after sunrise and the last hour before sunset, known as the golden hour, produces warm, soft light that enhances skin tones beautifully.
- Artificial light: If shooting indoors or at night, use softboxes, ring lights, or reflectors to evenly illuminate your subject. Avoid harsh direct flash, which can create harsh shadows and unnatural highlights.
Experimenting with light direction, intensity, and color temperature will allow you to capture different moods and styles in your portraits.
3. Use the Right Lens
Choosing the right lens makes a huge difference in portrait photography. While many cameras can take decent photos with a kit lens, certain lenses help produce more professional results.
- Prime lenses: Lenses with fixed focal lengths, such as 50mm or 85mm, are popular for portraits because they produce sharp images and beautiful background blur (bokeh).
- Avoid wide-angle lenses: Using a lens that’s too wide can distort facial features, making noses appear larger or faces stretched.
- Aperture matters: A wide aperture (small f-number like f/1.8 or f/2.8) creates a shallow depth of field, which helps separate the subject from the background and makes the portrait look professional.
Choosing the right lens also helps you focus on the subject while creating pleasing, blurred backgrounds.
4. Focus on Composition
Composition is how you arrange elements in your photo. A well-composed portrait draws attention to the subject and creates a pleasing visual balance.
- Rule of thirds: Imagine your frame divided into a 3×3 grid. Position the subject’s eyes along the top horizontal line or one of the vertical lines for a balanced composition.
- Eye contact: Eyes are the most expressive part of the face. Make sure they are sharp and well-lit.
- Negative space: Don’t overcrowd the frame. Using negative space (empty areas around the subject) can make the portrait feel more professional and artistic.
- Angles and framing: Experiment with different angles—shoot from slightly above, below, or side-on. Sometimes a small tilt of the camera can dramatically improve the look.
A strong composition ensures your portrait looks thoughtful and intentional rather than casual or random.
5. Guide Your Subject
Even if your subject is photogenic, they may not know how to pose naturally. Giving gentle guidance can make a huge difference.
- Relaxed posture: Encourage your subject to shift weight, lean slightly, or sit comfortably. Natural poses often look better than stiff, formal ones.
- Facial expressions: Smile, laugh, or look serious—depending on the mood you want to convey. Sometimes capturing candid moments results in the most genuine expressions.
- Hands and body placement: Many beginners forget about hands. Avoid awkwardly placed hands; let them rest naturally or interact with props.
The more comfortable your subject is, the better your photos will turn out.
6. Pay Attention to Background
The background can either enhance or distract from a portrait. Always check what’s behind your subject.
- Keep it simple: A cluttered background draws attention away from the subject.
- Use natural frames: Doorways, windows, or arches can create a visually interesting frame for your subject.
- Bokeh effect: Shooting with a wide aperture can blur the background, keeping the focus on your subject.
Choosing the right background helps emphasize your subject and adds depth to your portraits.
7. Post-Processing Matters
Post-processing can elevate a good portrait to an amazing one. Editing allows you to correct exposure, enhance colors, and sharpen important details.
- Basic edits: Adjust brightness, contrast, and saturation to make your portrait pop.
- Skin retouching: Subtle retouching can smooth skin while keeping it natural. Avoid over-editing, which can make the image look artificial.
- Cropping: Sometimes a slight crop improves composition and focuses attention on the subject.
Software like Adobe Lightroom, Capture One, or even mobile apps can help refine your portraits.
8. Practice Regularly
Like any skill, portrait photography improves with practice. Take photos of friends, family, pets, or even yourself to experiment with lighting, angles, and poses. Review your work critically and learn from mistakes.
- Challenge yourself: Try photographing different types of people, ages, and expressions.
- Experiment with lighting: Move your subject to different lighting conditions to understand how it affects mood and tone.
- Study other photographers: Observe the work of professional portrait photographers and analyze what makes their images effective.
Consistent practice will develop your eye for detail, composition, and timing.
Conclusion
Taking better portrait photos is a combination of technical skill, creativity, and human connection. By understanding your subject, using proper lighting and lenses, composing carefully, guiding your subject, and editing thoughtfully, you can create portraits that are both beautiful and meaningful. Remember, the best portraits tell a story and capture the essence of a person—not just their appearance.
5 FAQs About Portrait Photography
1. Do I need an expensive camera to take great portraits?
No! While professional cameras help, understanding light, composition, and posing is more important than having the most expensive gear. Even smartphones can capture amazing portraits with the right techniques.
2. How do I make my subject feel comfortable?
Start by talking with them, telling jokes, or asking about their day. A relaxed subject naturally looks better in photos. Encourage movement and candid expressions instead of rigid poses.
3. What is the best time of day for outdoor portraits?
Golden hour, shortly after sunrise or before sunset, provides soft, warm light ideal for portraits. Overcast days also work well because clouds diffuse sunlight evenly.
4. Should I focus on the eyes or the whole face?
Always focus on the eyes. Sharp eyes are crucial in a portrait because they are the most expressive part of the face. Other areas can have slightly softer focus for artistic effect.
5. How can I improve my portraits without post-processing?
Focus on lighting, composition, angles, and subject guidance. Using natural light, selecting a clean background, and capturing genuine expressions often reduces the need for heavy editing.